728x90
1. 경량 패턴 ( Flyweight Pattern ) 정의
- 데이터의 일부를 다른 개체와 공유하여 메모리 사용을 최소화하는 패턴
2. 중복된 데이터가 사용된 예시
// 코드로 표현한 나무
class Tree
{
private:
	FMesh Mesh;
	FTexture Bark;
	FTexture Leaves;
	FVector2D Position;
	double Height;
	double Thickness;
	FColor BarkTint;
	FColor LeafTint;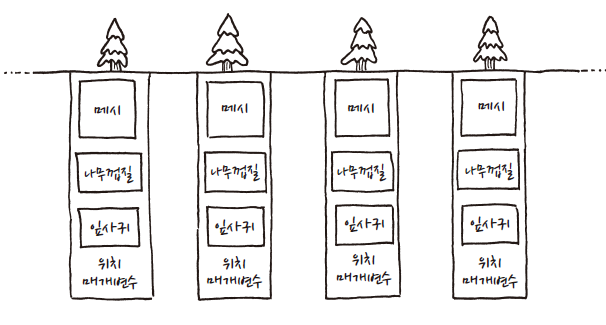
};- 동일한 나무를 그리지만, 메시, 나무껍질, 잎사귀 등 동일한 데이터가 중복돼 있다.
3. 중복된 데이터를 공유한 예시
// 중복된 데이터
class TreeModel
{
private:
	FMesh Mesh;
	FTexture Bark;
	FTexture Leaves;
};

// 코드로 표현한 나무
class Tree
{
private:
	// 공유된 데이터
	TreeModel* Model;

	FVector2D Position;
	double Height;
	double Thickness;
	FColor BarkTint;
	FColor LeafTint;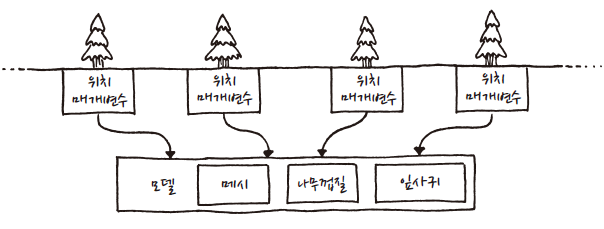
};- 게임 내 동일한 메시와 텍스처는 한 번만 메모리에 올리면 되기 때문에, TreeModel 객체는 하나만 존재한다.
- 나무 인스턴스는 공유 객체인 TreeModel을 참조하되, 인스턴스 별로 다른 상태 값만 남겨둔다.
- 공유할 수 있는 데이터를 고유 상태 ( 메시, 나무껍질, 잎사귀 등 )
- 인스턴스 별로 값이 다른 데이터를 외부 상태 ( 위치, 색상 등 )라고 부른다.
4. 코드 사용 예시
class Terrain
{
public:
	Terrain( int InMovementCost, bool InIsWater, FTexture InTexture )
		: MovementCost( InMovementCost ), bWater( InIsWater ), Texture( InTexture ) {}

	int GetMovementCost() const { return MovementCost; }
	bool IsWater() const { return bWater; }
	const FTexture& GetTexture() const { return Texture; }

private:
	int MovementCost;
	bool bWater;
	FTexture Texture;
};

class World
{
public:
	World()
		:GrassTerrain( 1, false, GRASS_TEXTURE ),
		 HillTerrain( 3, false, HILL_TEXTURE ),
		 RiverTerrain( 2, true, RIVER_TEXTURE ) {}

	void GenerateTerrain();

	const Terrain& GetTile( int InX, int InY );

private:
	Terrain* tiles[ WIDTH ][ HEIGHT ];

	Terrain GrassTerrain;
	Terrain HillTerrain;
	Terrain RiverTerrain;
};

void World::GenerateTerrain()
{
	for ( int x = 0; x < WIDTH; ++x )
	{
		for ( int y = 0; y < HEIGHT; ++y )
		{
			//if ( 조건1 )
				tiles[ x ][ y ] = &HillTerrain;
			//else if ( 조건 2 )
				tiles[ x ][ y ] = &GrassTerrain;
			//else
				tiles[ x ][ y ] = &RiverTerrain;
		}
	}
}

const Terrain& World::GetTile( int InX, int InY )
{
	return *tiles[ InX ][ InY ];
}- 공유할 수 있는 고유 상태는 Terrain 객체로 묶어서 사용했다.
- 타일을 구성할 때 각각의 Terrain 객체들을 공유해 사용함으로써 메모리를 절약할 수 있다.
반응형
'Design Pattern > 게임 프로그래밍 패턴' 카테고리의 다른 글
| [Design Pattern] 상태 패턴 (0) | 2022.07.31 |
|---|---|
| [Design Pattern] 싱글턴 패턴 (0) | 2022.07.30 |
| [Design Pattern] 프로토타입 패턴 (0) | 2022.07.30 |
| [Design Pattern] 관찰자 패턴 (0) | 2022.07.30 |
| [Design Pattern] 명령 패턴 (0) | 2022.07.29 |